Thursday 26 January 2012

Chocolate Peanut Butter Cake


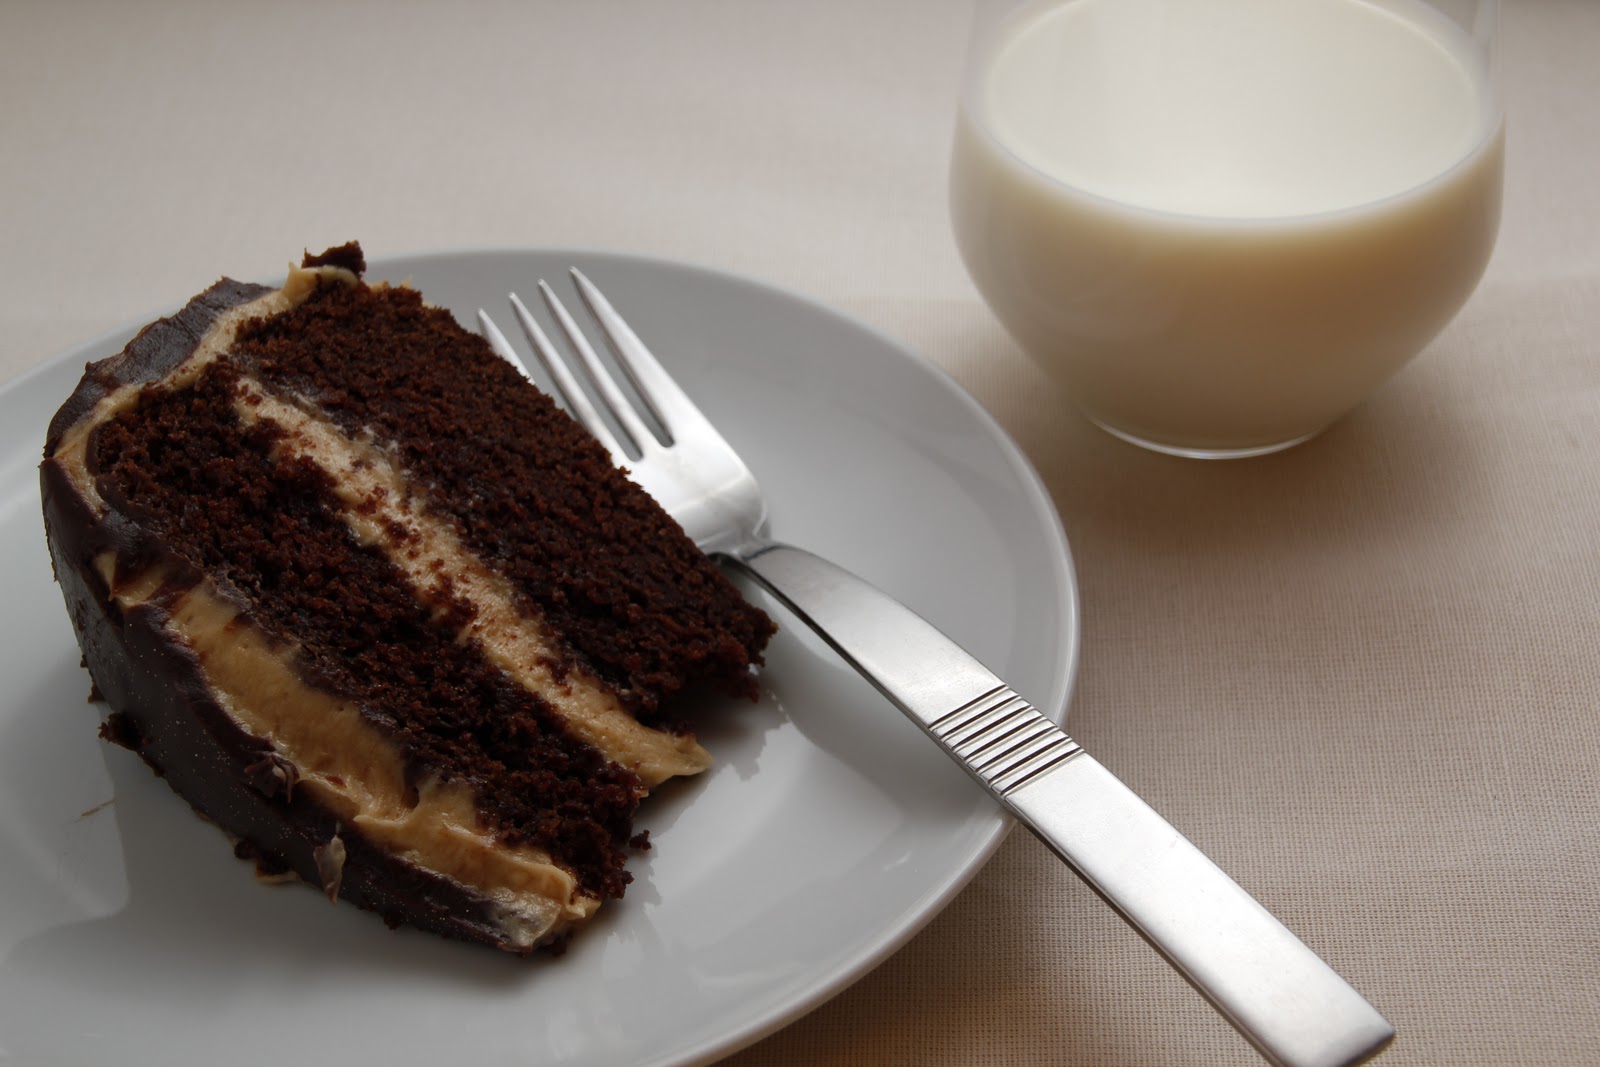
Ok, breathe a sigh of relief everyone. I have found the perfect chocolate cake for you all. A perfect, no mixer required, one tin wonder. It was Chub's birthday last week and I had to pander to his every request. Nothing but a chocolate and peanut butter cake would do and of course it then had to be produced. I had a quick look through my many, many recipe books and settled on the chocolate cake from Gizzi's Kitchen Magic, which is actually an Earl Grey chocolate fudge cake. I omitted the tea when I made it and was seriously dubious of the melt and mix method but soldiered on nonetheless. The cake came out of the oven perfectly flat on top, which would make it great for using for cakes that are going to be iced with sugar paste. This one however was destined to be covered with a peanut butter cream cheese icing with a peanut butter chocolate ganache inspired by Smitten Kitchen (completely in love with this lady!)

Even with the icing, I found the cake to be not too rich and it was incredibly more-ish. If you are a peanut butter fan, this one is for you....


Ps - For birthday lunch we went to The Residence Restaurant Forty One on Stephen's Green and did the tasting menu. The dining room was beautiful, the staff delightfully well trained and the food completely faultless and absolutely delicious. I'm already looking forward to our next trip!


Chocolate Fudge Cake - adapted from 'Gizzi's Kitchen Magic' Gizzi Erskine
150ml boiling water, cooled a little
100g butter, melted and cooled
3 large eggs
150g soft dark brown sugar
100g light brown sugar
250g self-raising flour
120g plain chocolate (70% cocoa solids) melted and cooled
1 tsp bicarbonate of soda
1 tsp baking powder
3 tbs greek yogurt or natural yogurt

Method
Preheat the oven to 180 degrees or 160 degrees fan assisted.
Grease and line 20cm round deep cake springform tin with butter and greaseproof paper.
Place all ingredients into a mixing bowl or food processor and mix until you have a smooth batter.
Pour the batter into the tin and level the surface.
Bake in the oven for 45-50 minutes, or until a skewer inserted into the centre of the cake comes out clean.
Leave in the tin to cool in its tin, covered by a clean tea-towel for 2 hours.

Peanut Butter Cream Cheese Icing - Smitten Kitchen, but previously from 'Sky High: Irresistible Triple Layer Cakes'
I've slightly changed the ingredients as I can't deal with cups! It's also important to have the ingredients at room temperature
Ingredients
250g full-fat cream cheese
110g butter
500g icing sugar
2/3 cup smooth peanut butter

Method
Cream the cream cheese and butter together until well combined.
Add the icing sugar, 1 cup at a time and mix well after each addition.
Add the peanut butter and mix until well combined.

Chocolate Peanut Butter GanacheSmitten Kitchen, but previously from 'Sky High: Irresistible Triple Layer Cakes'
225g dark chocolate (70% solids)
3 tbs smooth peanut butter
2tbs corn syrup (I was able to find this in the Asia Market randomly, but if you can't find it maybe add golden syrup or just leave it out)
1/2 cup double cream

Method
Combine the chocolate, corn syrup (if using) and peanut butter into a double boiler until melted. Slowly add the cream and stir well between each addition. If you do this too quickly, the mixture may freeze.

Assembly
I wrap the cake in cling film and put in the freezer for about an hour, before cutting in two layers with a large serrated knife. This stops the cake crumbling too much when cutting in half.
Once the cake is cut in half, add some of the cream cheese mixture to the centre and spread. Add the top half and then spread the remaining mixture over the cake. You will have enough icing to have a fairly thick layer. This is a very good thing.
Spread the chocolate ganache on top of the cream cheese mixture. To get a smooth finish, dip a long palette knife in hot water, dry it and then using it to smooth the icing.

Done!

Some Instagram pictures


Monday 16 January 2012

Chocolate Macarons with Confiture de Lait


I have a confession, another one! I used to think macarons were macaroons. I know, it's a cardinal sin! What was I thinking? Infact, the first time I had a macaron, I didn't even know what it was called. We were in a bakery on our first visit to Paris three years ago and when we are in France, I am in charge of speaking. I did French in school, but I wasn't very interested, as frankly, it wasn't boys. So I was doing my usual, trying to speak in my pigeon French, when I do this, I feel like the Earth stands still waiting for my next word. Je. Voudrais. Un. Croissant. Et. Un. Pain. Au. Chocolat. S'il. Vous. Plait. The person waiting for me to finish my sentence has nearly fallen asleep and usually responds in perfect English. Anyway, I was je voudrais-ing nearly everything in the bakery and managed to get a macaron in my bag of goodies, by accident. What a blooming great accident though. Crispy and chewy and really delicious.

I set about replicating my happy accidental purchase at home and it came out as something to be proud of. I can't remember if it had any 'feet' but I didn't know the importance of those back then. After much research over the years, I've discovered that 'feet' are the sign of success for a macaron, they are the product of the skin forming on the uncooked macarons. And they have a funny name. Feet. Hehe!

We had a macaron masterclass during my cookery course a few months ago, the recipe was so exact. 63g water, 190g egg whites, etc. It involved making an Italian meringue first before mixing it into the almond mixture. I tried this recipe on Saturday and did not have much success. The macarons were nearly too bad to even put in the bin. They were that bad. I wasn't going to let them get the better of me and I tried a different recipe the next day. I was lucky to win a macaron book on the lovely Colette's blog and have been wanting to try it for a while now and it worked like a dream for me.

I brought a jar of confiture de lait in Galeries Lafayette Gourmet when we were in Paris last October  and I thought that would make an interesting buttercream flavour for sandwiching the macarons together. I have seen jars of the confiture locally so it might not be too hard to pick up. If you can't find it, I think a jar of caramel sauce or dulce de leche would work just aswell.


Chocolate Macarons - from 'Macarons' by Annie Rigg  & Confiture de Lait Buttercream- adapted from Hummingbird Bakery 'Cake Days' basic buttercream recipe. 
Makes 16 macarons


Ingredients
180g icing sugar
100g ground almonds
2tbps cocoa powder
120g egg whites, about 3 eggs
a pinch of salt
40g vanilla caster sugar
red food colouring paste
2 solid baking sheets, lined with non-stick baking parchment - if you need a guide for piping, trace around a 2 inch diameter pastry cutter onto the baking sheet and then turn the paper over.


Method
Blend the icing sugar, ground almonds and cocoa powder in a food processor until throughly combined. Set aside. 
Tip the egg whites into freestanding mixer and add the salt. Beat until the egg whites can hold a stiff peak. 
Continue to beat the egg whites at a medium speed and start adding the caster sugar a teaspoon at a time, mixing well after each addition. The mixture should be thick, white and glossy. 
Dip a skewer into the food colouring paste and stir into the egg whites. Mix until combined. 
Using a large metal spoon, fold the ground almond mixture into the egg whites. 
The mix should be throughly incorporated and smooth, this can take up to 1 minute. When it is ready, the mixture should drop from the spoon in a smooth molten mass. 
Fill a piping bag with the mixture and pipe evenly sized rounds, about 2 inches in diameter onto the prepared sheets. 
Tap the bottom of the baking sheets sharply, once, on the work surface to expel any large air bubbles. 
Leave the macarons for at least 15 minutes, and up to 1 hour, until they have set and formed a dry shell. They should not be sticky, tacky or wet when tested with your fingertip. 
Preheat the oven to 170 degrees or 150 degrees fan. 
Bake the macarons on the middle shelf of the preheated oven, one sheet at a time, for 10 minutes. The tops should be crisp and the bottoms dry. Leave to cool on the baking sheet. 


Confiture de Lait Buttercream - Adapted from Hummingbird Bakery basic buttercream
90g butter, softened
250g icing sugar
2tbsp milk
2tbsp confiture de lait or dulce de leche or caramel sauce


Method
Blend the butter and icing sugar in a freestanding mixer until sandy. 
Add the milk and mix until pale and creamy. 
Add the confiture de lait and mix well. 
Fill a piping bag with the icing. 


Assembly
Pipe the buttercream on to a macaron shell and top with a lid. Simples. 


Some Instagram pictures.....


The Sunday V the Saturday Macaron. 

Tuesday 10 January 2012

Chocolate Orange Cake


It's that time of year again. January. Boo. Dark nights and cold days. It was alright before Christmas when we knew we had a feast to look forward to and days away from the desk. But now it feels a little sad. Going to work in the dark and coming home in the dark is no fun. Sometimes I feel like the worst part of my day is standing in the cold waiting on the train to arrive. If I were to look on the brightside at least that means that the worst part of my day is over terribly early and I can get on with the rest of the day with nothing so bad to dread (except the gym, I will dread the gym for a few weeks yet 'til I get back in the spin swing of it again)

But dark nights mean lighting cosy candles, snuggling down on the sofa, reading a book, drinking red wine or baking a cake. Not too shabby in my opinion.


I was gifted Lilly Higgins 'Make Bake Love' for Christmas, a signed copy nonetheless! It's a lovely book and there are many things which I have picked out to bake already. This recipe was picked out by sister, who celebrates the first birthday of the year which falls on the third. Not a good day for celebrating a birthday as it's when everyone normally goes back to work with a heavy heart and hips.

The cake is a simple two layer sponge cake. I've changed it around a little from Lillys. I've added extra cocoa, chocolate, zest and juice to the cake.  I've changed the icing a bit too and instead of Lily's suggested white buttercream and chocolate ganache I've made an extra chocolate-y buttercream with pimped up orange flavouring. Below is my adaption.


Chocolate Orange Cake - Adapted from Lilly Higgin's 'Make Bake Love'

Cake Ingredients
225g softened butter
225g caster sugar
4 eggs
50ml milk
1 orange, zest and juice
225g flour
2 tsp baking powder
4 tbsp cocoa
50g dark chocolate orange, melted


Buttercream Ingredients
200g icing sugar
60g cocoa
1 orange, zest and juice
1 tbsp milk


Decoration Ideas
Dark chocolate orange, grated or orangettes (yum), Terry's chocolate orange segments (double treble yum)


For the cake...
Preheat the oven to 180 degrees or fan 160 degrees.
Grease 2 x 20 cm round sandwich pans and line the bottoms with greaseproof paper.
Sift the cocoa, flour and baking powder together into a bowl.
Cream the butter and sugar in a freestanding mixer until pale and fluffy.
Add the eggs one by one, adding a tablespoon of the dry ingredients after each egg to stop the mix curdling. 
Once the eggs are fully mixed in, add the orange zest, orange juice, milk and melted chocolate. Mix well again.
Fold in the remaining dry ingredients gently.
Split between the two prepared tins and bake for about 25-30 minutes until a skewer comes out clean.
Remove from the oven and allow to cool slightly on a rack.
Remove the cakes from the tins and allow to cool completely on a rack.


For the icing...
Sift the icing sugar, milk, cocoa, orange zest and juice in a freestanding mixer until well combined.


Assembly....
Sandwich the two layers together with a generous helping of icing.
Spread the remaining icing over the top and around the sides. A long flexible palette knife is useful here!
Decorate to your hearts content.

Friday 6 January 2012

Caramelised Balsamic Onions with Tipperary Blue Cheese

I made home-made pizzas while my outlaws were visting at Christmas to use up odds and ends left from our cheeseboard. I did some with a roasted tomato and basil sauce with mozzerella and some with balsamic caramelised onions and blue cheese. Can you guess which one everyone was fighting over?

We make home-made pizza a lot in our house. They are actually really easy to put together, mostly from  ingredients in the back of the press and are a good vehicle for anything in your fridge. It's easy to ask the freestanding mixer to knead your dough for ten minutes and you will get a nice dough. But if you really want to tone your arms you can knead the dough yourself the old fashioned way, I think it gives a better result too.


We've been experimenting with various pizza doughs over time but now we are converted to Hugh Fearnley-Whittingstall's River Cottage Veg Every Day recipe. It's really versatile and we've already used it to make amazing Indian flatbreads to have on curry night.

So wait are you waiting for....?

Pizza dough ingredients - River Cottage Veg Every Day Hugh Fearnley-Whittingstall
Makes 2 large pizzas
250g plain flour
250g strong flour
1 1/2 tsp finely ground sea salt
1 tsp fast action yeast
325ml warm water
1 tbsp olive oil

Method
Mix the flours, yeast and salt together in a bowl. Add the water and olive oil and mix to form a dough. Knead for about 10 minutes until you have a smooth elastic dough. If you are hand kneading, resist the urge to add more flour, it's supposed to be a wet, sticky dough. Add a little oil to a bowl and rub the dough ball around it (so that has an oil film) before covering with cling film and leaving it in warm place until it has doubled in size, at least an hour. In the meantime get your toppings prepared and the oven heated. Then go straight to the assembling stage below.

Topping ingredients
Cheese of your choice, I find a good strong cheese works really well against the sweetness of the onions here. I'm really impressed with Aldi's Tipperary Blue or I wouldn't say no to a piece of goatscheese either.

Balsamic caramelised onions- The Meat Free Monday Cookbook, I've talked about this book a little more here. Enough to cover 2 large pizzas.
2 red onions. Cut each in half and then into 6 wedges per half.
Olive oil
40g dark brown sugar
2 tbsp balsamic vinegar
100ml water

Method
Place the onions into a saucpan with the olive oil over a medium heat and allow to cook until they turn brown on the edges.
Add the sugar, vinegar and water and bring to the boil. Reduce the heat and allow the mixture to simmer on a low heat until the sauce is reduced to a sweet syrupy glaze. Set aside until required.

Assembling
Whack the oven up to it's highest, I think for me that's about 250 degrees or 230 degrees fan. Heat your pizza stone until it's screaming hot, if you don't have a pizza stone use a heavy non stick oven rack. When you have knocked back the dough, roll out thinly. I can rarely get it into a perfect circle, so don't feel bad if you can't either. Remove your very hot stone or rack from the oven and place your dough on top. Add a thin layer of onions and then add your cheese. Bake in the oven until the cheese is bubbling and the base is golden brown. Top with salad.

Tuesday 3 January 2012

Baileys and Hazelnut Meringue Cake


I am an addict.  I am addicted to buying cookery books and magazines. I have spent a fortune on them, I'm trying to stop but it's so hard. I rarely buy in bookstores anymore and go straight to the internet to feed my habit (like what I did there?) There's nothing nicer than getting nice post through the letterbox. I turned to the library and borrowed a book I liked the look of but that only made me want it for my own all the more. Santa granted my wish and brought it for Christmas. Nicely gift wrapped under a tree beats nice post any day. I love the thrill of a new book and deciding what I'm going to cook first. I love magazines too for seasonal ideas. I've also tried cutting them out too but I don't always win. I pass through Heuston Station on the way home every evening, when I'm at my weakest, tired and hungry and  Easons is always there trying to to tempt me with a magazine to make my soul feel better. My purse doesn't feel the same. Me and the purse are on a diet now.... sigh.

I had a huge collection of food magazines collecting dust on my shelves so during the summer I was particularly ruthless and did a clear out. I went through each of them and ripped out the recipes I wanted planning to file them all properly with an index. As usual, the novelty wore off this project pretty quickly, so while I have them in a folder, they are not indexed or in any sort of order. So I will probably never look at them again. I did keep all of my Christmas magazines though and flicked through them in December for some inspiration. I came across this meringue cake and thought it would make a perfect Christmas Day dessert, but really it would be a great dessert any day.

We were kindly gifted a bottle of Hazelnut Baileys by some friends which I took as a sign. Some Ferrero Rocher also mysteriously turned up (I took this as another sign), chocolate, hazelnuts and Baileys - a match made in heaven. I chopped up the Ferrero Rocher and layered them on top of the softly whipped cream. If you would like to make it more seasonal during the Summer, some raspberries or strawberries would be amazing too, I think.


Baileys & Hazelnut Meringue Cake - BBC Good Food Magazine December 2009
Serves 6

Notes - I picked up a bag of slightly roasted hazelnuts in the Asia Market on Drury Street very reasonably. The added bonus was the skins were already removed, which meant I didn't have to roast or toast the hazelnuts and then rub them like mad in a tea towel trying to remove the skins. I still gave them a light toast in dry pan to add extra flavour.
Do ahead, the meringues can be made up to 3 days in advance if stored in an airtight tin.
I always use vanilla caster sugar.
Please don't throw away the egg yolks, use them for custard or ice-cream or lemon curd or extra luxurious scrambled eggs. I hate wasting them.

Ingredients
150g toasted hazelnuts
5 egg whites
280g caster sugar
1 tbsp white wine vinegar
300ml double cream
3 tbsp Baileys or more to taste
Icing sugar to dust


Method
Preheat the oven to 190 degrees, fan assisted 170 degrees. Line 2 x 20cm round tins with foil, then lightly oil the foil. 
In a food processor, whizz the hazelnuts until finely ground. 
Whisk the egg whites until they form stiff peaks. Whisk in most of the sugar a spoonful at a time, until the mixture is stiff and glossy. Stir in the remaining sugar into the nuts and fold into the meringue with the vinegar. 
Divide the mixture between the two tins and level the tops. 
Bake for 40-45 minutes until firm, then cool in the oven 
When the meringues are cold, carefully peel off the foil. 
To serve, whisk the cream, icing sugar and Baileys together until softly whipped. 
Put one of the meringues, top side down on a plate, then spread with the cream. Put the other meringue layer on top and dust generously with icing sugar.